Website Growth
Image Optimization for SEO: A 10-Step Checklist, Tested on Anobee's Own Images
By Bibek Thapa · Updated · 13 min read
Quick Answer
Image optimization for SEO means serving the right format at the right size, describing each image in text Google can read, and never delaying the main image. Use WebP, size files to twice the display width, compress to under 100 KB, write specific alt text, set width and height, keep the top image out of lazy loading, and put images next to the text they support.
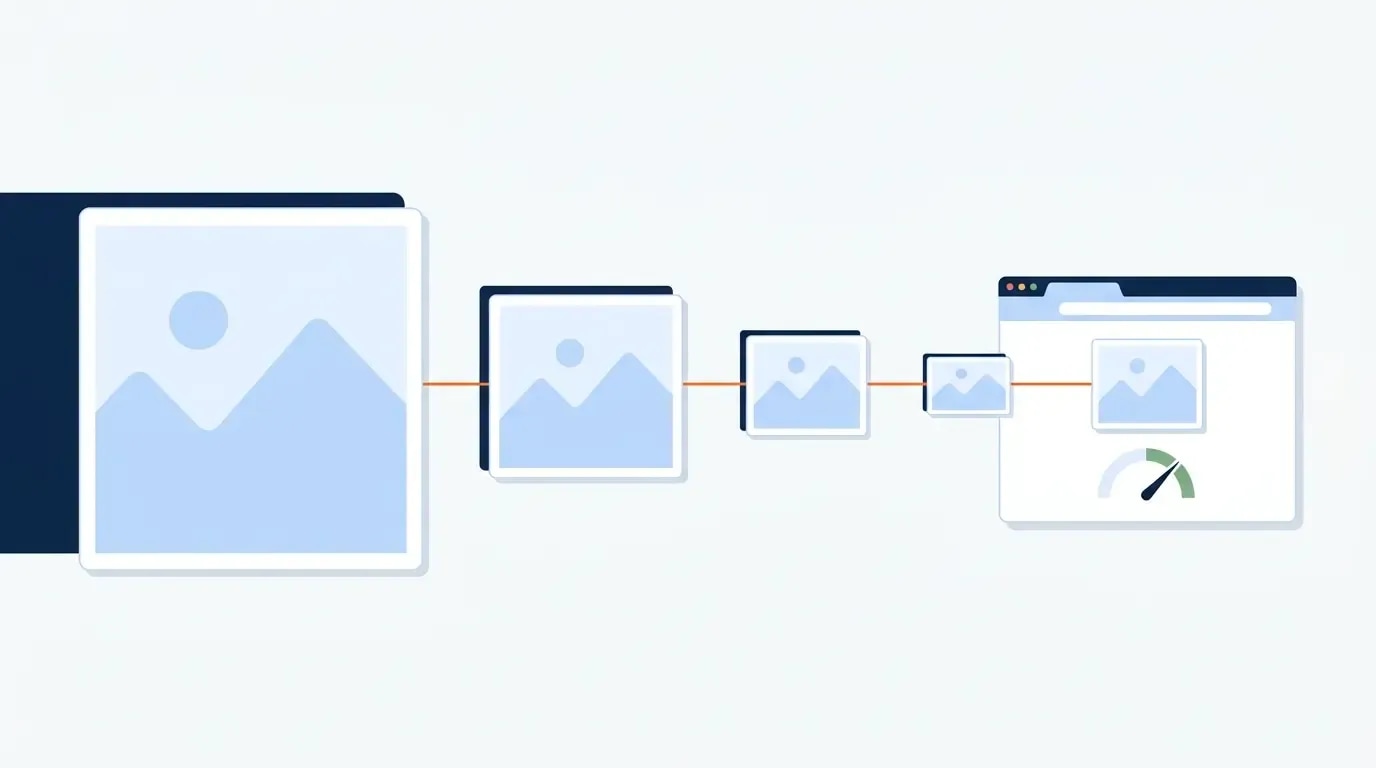
Table of ContentsOn this page
Key Takeaways
- Run PageSpeed Insights first. On this page it found one image problem worth 6.4 KiB, so more compression would have changed nothing.
- Format saved more than quality settings. One screenshot went from 453 KB as PNG to 44 KB as WebP at quality 85.
- Sharp is not the same as readable. Anobee's 2400px frames were crisp, but their text showed at 7 to 10px in a 680px column.
- Google calls alt text the most important image attribute and warns against stuffing keywords into it.
- Never lazy load the main image. Set fetchpriority="high" on it and keep width and height on every image.
Image optimization for SEO means three things: serving the right file at the right size, describing the image in text Google can read, and not delaying the image that loads first. Most guides stop at a list of tips. This one runs the checklist on real pages, because the results did not match the usual advice. On the page you are reading, PageSpeed Insights found only 6.4 KiB of image savings. Anobee's biggest image problem was also not file size. It was text too small to read.
How this was tested: all figures come from Anobee's own pages and files, measured on 4 November 2026. That covers a PageSpeed Insights mobile test of this URL, a compression test on one real screenshot, and a delivery test through Cloudinary, the image CDN Anobee uses. The results describe this site and these files. They are examples to learn from, not benchmarks. Google rules are taken from Google Search Central and were checked the same day.
What Anobee's own images showed
Four findings shaped the order of the steps below.
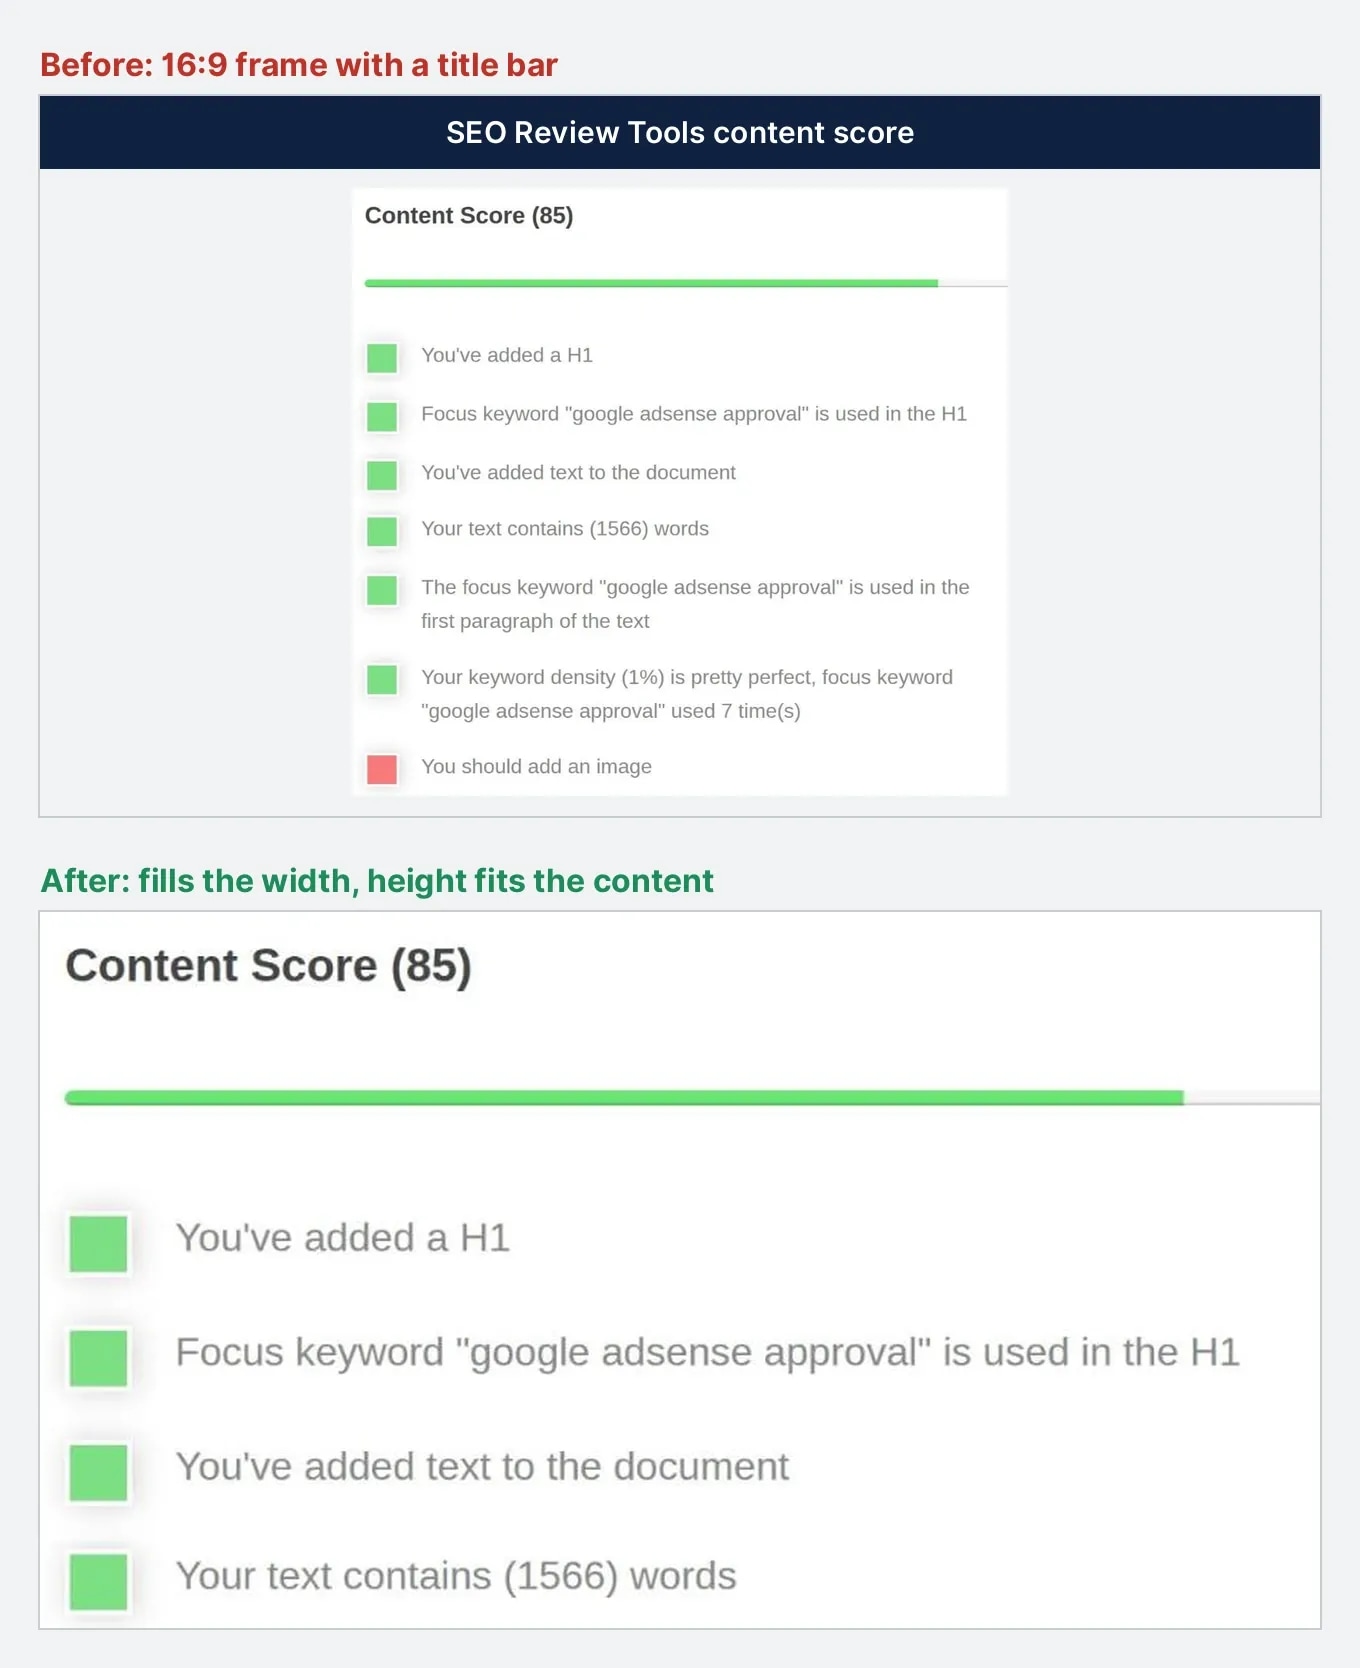
Sharp is not the same as readable. Anobee's first screenshots looked blurry on the live site. They were 800x600 captures stretched into a 1200x675 frame. Rebuilding them as sharp 2400x1350 frames fixed the blur and created a new problem: inside a 680px column, the text in those frames shrank to about 7 to 10px. Readers could see a crisp image and still not read it.
Format saved far more than quality settings. One screenshot dropped from 453 KB as PNG to 44 KB as WebP. Moving Cloudinary from q_auto to its highest automatic setting, q_auto:best, changed the same kind of file by about 2%.
The main image was already doing its job. PageSpeed named the hero image as the Largest Contentful Paint (LCP) element, which is the largest item visible as the page loads. It passed every LCP image check.
Fast images did not make a fast page. LCP on the mobile test was 3.2 seconds, and First Contentful Paint was also 3.2 seconds. Nothing painted until 3.2 seconds, so the delay came before the image, not from it.
Image optimization for SEO in 10 steps
Work through these in order. Step 1 tells you which of the others matter on your page.
1. Run PageSpeed Insights before you change anything
Open PageSpeed Insights and test the page on mobile [7]. Read three things: the LCP element, the "Improve image delivery" list, and whether the LCP image passes the discovery checks.
Here is the mobile result for this page on 4 November 2026:
| Metric | Result |
|---|---|
| Performance score | 81 |
| Largest Contentful Paint | 3.2 s |
| First Contentful Paint | 3.2 s |
| Total Blocking Time | 240 ms |
| Cumulative Layout Shift | 0.007 |
| Improve image delivery | 6.4 KiB, from the header logo only |
Google's good thresholds are LCP of 2.5 seconds or less, Interaction to Next Paint of 200 ms or less, and Cumulative Layout Shift of 0.1 or less, measured at the 75th percentile of page views [5]. A single lab test on an emulated phone is a diagnosis, not that score. The report showed no real-user data for this page.
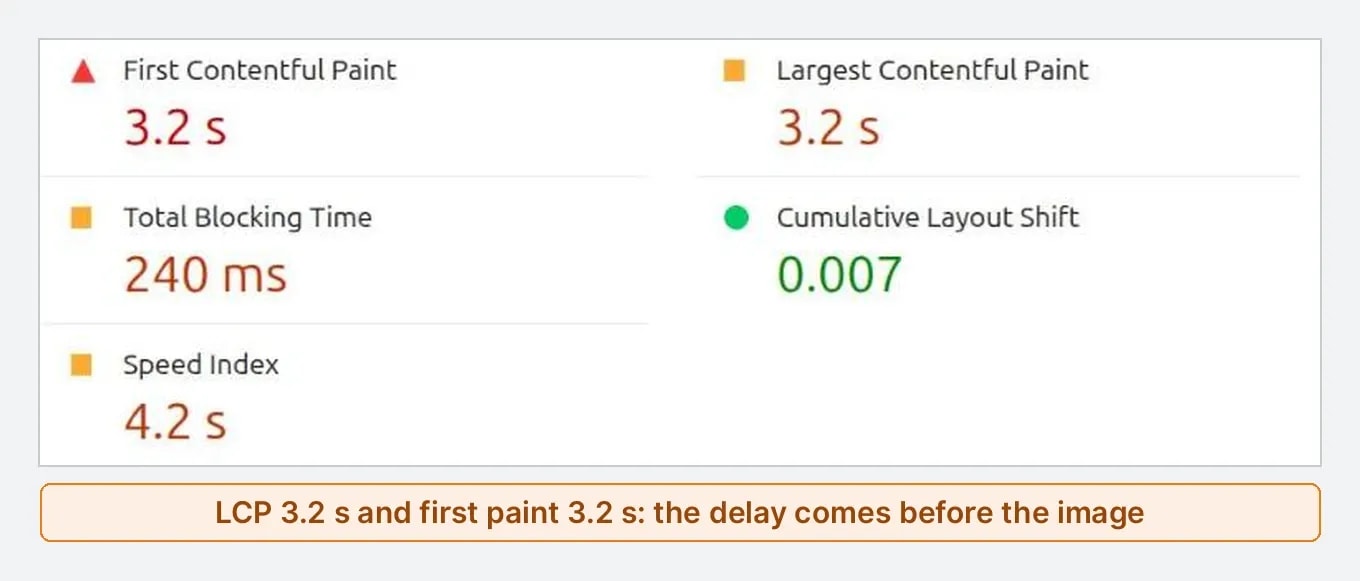
Look at the last row. The only image fix on offer was a logo stored at 380x95 and shown at 180x45. Recompressing the article images would have saved nothing, which is why the audit comes first.
2. Size each image for where it displays
Find the width your layout actually shows, then make the file about twice that width so it stays sharp on high-density screens. Anobee's article column is 680px wide, so body images are 1360px wide.
Larger is not better. A CDN that limits rather than enlarges, as Anobee's setup does, cannot add detail a small file never had. And a 2400px file in a 680px column costs bytes that nobody sees.
3. Make text readable at display size
This step is missing from most guides, and it matters for any screenshot, chart or diagram. Work out the text size a reader actually gets:
On-screen text size = text size in the file × column width ÷ file width
Text at 30px in a 1360px file shows at 15px in a 680px column. Anobee now keeps text at 30px or more in body images, and it follows three habits to get there:
- Zoom the element before capturing. Enlarge only the card or table you need in the browser, then take the screenshot. Do not enlarge the screenshot afterwards, because that adds blur.
- Crop tight. The less empty interface in the frame, the bigger the text becomes.
- Drop the fixed frame. A 16:9 canvas with a title bar forces a screenshot to shrink. Let the height fit the content, and let the CMS caption carry the title.
Those rules produced 17 screenshots and charts across four Anobee articles, each between 25 and 92 KB.
4. Choose the format
Google indexes BMP, GIF, JPEG, PNG, WebP, SVG and AVIF images [1], so format is a speed decision and not an indexing risk.
| Format | Use it for | Browser support (MDN, 4 Nov 2026) |
|---|---|---|
| WebP | Almost everything, including screenshots | All versions of major browsers; Safari needs version 14 and macOS Big Sur or later |
| AVIF | Large photos and hero images | Chrome 85, Edge 121, Opera 71, Firefox 93, Safari 16.1 |
| JPEG | Fallback and photos in older workflows | Universal |
| PNG | Transparency, or source files before conversion | Universal |
| SVG | Logos, icons and line art | Universal |
| JPEG XL | Testing only, with a fallback | Chrome 155, Edge 155, Firefox 158, Safari 17 |
MDN advises serving AVIF, WebP and JPEG XL with a fallback, using the <picture> element [2]:
<picture>
  <source srcset="hero.avif" type="image/avif">
  <source srcset="hero.webp" type="image/webp">
  <img src="hero.jpg" alt="Describe the image" width="1200" height="630">
</picture>
Many CDNs do this for you. Anobee's Cloudinary URLs use f_auto, which picks a format for each browser, so the markup stays simple.
5. Compress to a size target
Good image optimization for SEO sets a size target for each kind of image and stops there. Here is one real screenshot at 1360px wide, saved at different settings:
| Format and setting | File size |
|---|---|
| PNG | 453 KB |
| JPEG, quality 85 | 96 KB |
| WebP, quality 92 | 65 KB |
| WebP, quality 85 | 44 KB |
| WebP, quality 80 | 36 KB |
| WebP, quality 75 | 30 KB |
| WebP, quality 60 | 26 KB |
Moving to WebP did most of the work. Dropping below quality 75 saved only 4 KB here, while text edges start to suffer on screenshots.
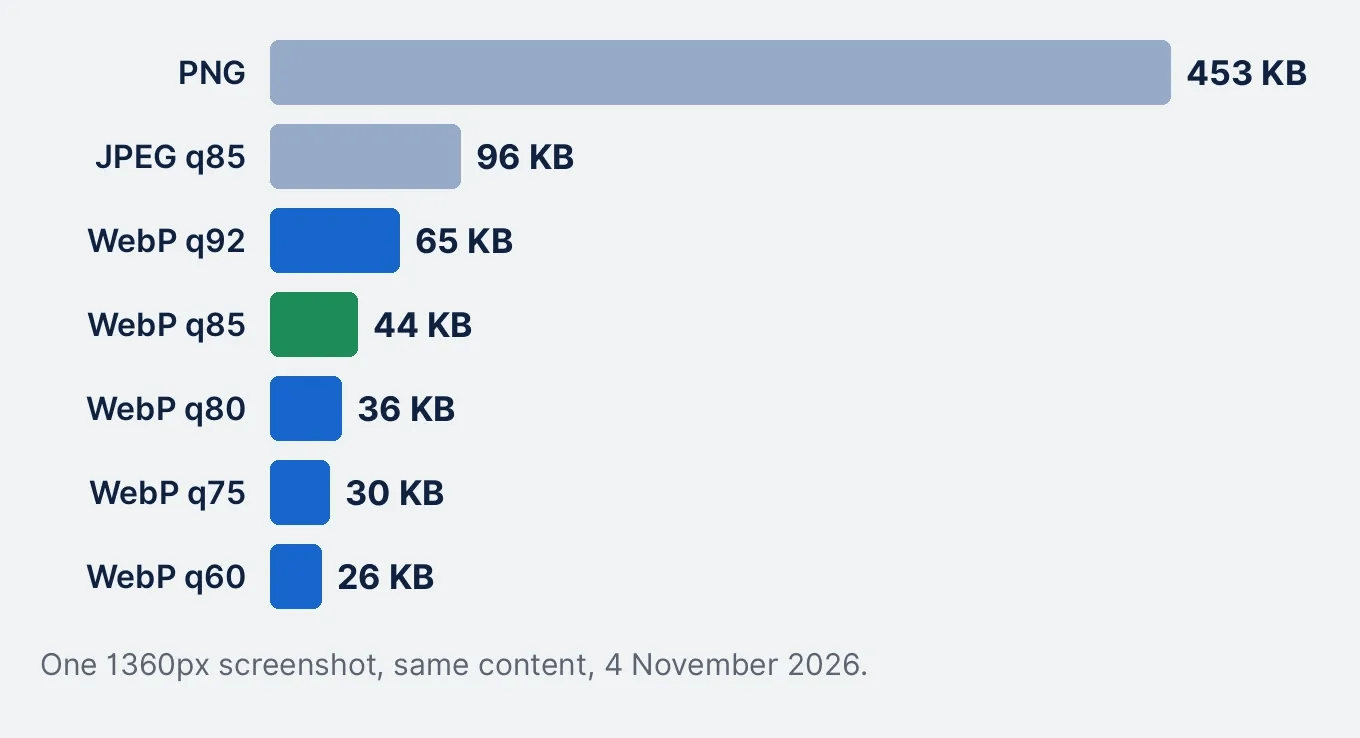
Anobee's rule is under 100 KB per body image, so the build script starts at quality 92 and lowers it only until the file fits. That keeps the highest quality the budget allows.
A second test ran a different 1360px screenshot through Cloudinary:
| Cloudinary setting | File size |
|---|---|
| PNG | 383 KB |
WebP, q_auto:best | 57 KB |
WebP, q_auto | 55 KB |
WebP, q_auto:eco | 48 KB |
AVIF, q_auto:best | 41 KB |
Squoosh handles one-off files in the browser at no cost. On WordPress, a compression plugin that runs on upload stops the step being skipped.
6. Write filenames and alt text for people
Google asks for short, descriptive filenames rather than generic ones such as image1.jpg [1]. Rename before you upload, because renaming later changes the URL.
Google calls alt text the most important attribute for image metadata, and it warns against filling alt attributes with keywords [1]. Describe what the image shows and why it is there, as you would to someone on the phone.
- Weak:
alt="image seo image optimization seo tips" - Better:
alt="PageSpeed Insights mobile report showing an LCP of 3.2 seconds and a layout shift of 0.007"
Purely decorative images take an empty alt="", so screen readers skip them. If you use WordPress, check what your SEO plugin does with empty alt text. The Rank Math image SEO guide covers a case where decorative images get generated text.
7. Serve responsive images and reserve the space
srcset offers the browser several widths, and sizes tells it how wide the image will display. Always include a normal src as well, because Google notes that some browsers and crawlers do not support these attributes [1].
<img src="photo-1200.webp"
     srcset="photo-640.webp 640w, photo-1200.webp 1200w, photo-1920.webp 1920w"
     sizes="(min-width: 720px) 680px, calc(100vw - 40px)"
     alt="Describe the image" width="1360" height="770" loading="lazy">
That sizes value is the one this site uses for body images. Always set width and height, so the browser reserves the space before the file arrives. Anobee's Cumulative Layout Shift of 0.007 reflects that.
8. Lazy load everything except the main image
Use loading="lazy" for images below the fold. Never use it on the LCP image, because it always adds unnecessary load delay [3]. An analysis of WordPress lazy loading found that excluding images above the fold fully reversed the LCP harm while keeping the byte savings [4].
Then raise the priority of the main image with fetchpriority="high". Google's web.dev guide says that using it on more than one or two images makes it unhelpful [3]. The LCP image should also appear in the initial HTML, so the browser finds it early [3].
Anobee's hero image uses loading="eager" and fetchpriority="high", and every image below it uses loading="lazy". PageSpeed passed all three checks: not lazy loaded, high priority, and found in the first HTML.
When those pass and LCP is still slow, stop working on the image. Web.dev splits LCP into four parts: time to first byte, load delay, load duration and render delay [3]. On this page, First Contentful Paint and LCP are both 3.2 seconds, which points at the page's first paint rather than the picture.
9. Put images beside the text they support
Google says to place images near relevant text, on pages about the same subject, and it uses captions and titles to understand them [1]. This is where image optimization for SEO meets long-tail searches.
A generic stock photo tells Google little. A screenshot of one exact step, with a specific filename, an accurate alt text and a caption, sits next to text about that step. That matches a narrow question far better than repeating a keyword would.
Use a caption when it adds something: the source, the date or what to notice.
10. Make images easy for Google to find and choose
Google finds images through the src attribute of an <img> element and does not index CSS background images [1]. Anything you want found in Google Images must be a real <img>.
- Image sitemap. This helps Google discover images it could otherwise miss, including images hosted on a CDN [1]. It is optional for a normal blog whose images are plain
<img>tags. - Structured data. For Article markup, Google recommends high-resolution images of at least 50K pixels, multiplying width by height, in 16x9, 4x3 and 1x1 ratios [6].
- Preferred image. You can signal a main image with
og:imageorprimaryImageOfPage. Google advises against logos, images with text and extreme aspect ratios for this slot [1].
That last point is worth keeping apart from step 3. A text-heavy screenshot can suit the article body, while the featured image should be a clean visual. Anobee uses 16:9 illustrations for featured images and text-friendly captures in the body.
Common image SEO mistakes
These habits waste image optimization for SEO effort:
- Compressing before auditing. The work goes to images that were never slowing the page.
- Stretching a small screenshot. It looks bigger and blurrier. Capture it larger instead.
- Using one fixed frame for every image. Tall panels shrink until nobody can read them.
- Lazy loading every image. A plugin that includes the first image delays LCP.
- Stuffing keywords into alt text. Google warns against it, and screen reader users hear it.
- Hiding important images in CSS. Google does not index them.
- Trusting a sharp preview on a large monitor. Check images at their real column width.
The image optimization for SEO checklist
Before you publish, confirm each image passes:
- PageSpeed Insights shows no real image problem on the page.
- File width is about twice the display width.
- Text in the image reads clearly at column width.
- WebP or AVIF is the format, or SVG for line art.
- File size meets your target (under 100 KB for body images on Anobee).
- Filename and alt text are specific and descriptive.
width,height,srcsetandsizesare set.- The top image is not lazy loaded, and it has
fetchpriority="high". - The image sits beside the text it supports, with a caption where useful.
- Important images use
<img>, not CSS backgrounds.
Selling products? The constraints differ, so see the guide to ecommerce image optimization. For the rest of the page, use the on-page SEO checklist.
Frequently Asked Questions
What is the best image format for SEO?
WebP is the safest default. Google indexes BMP, GIF, JPEG, PNG, WebP, SVG and AVIF, so format is a speed choice, not an indexing risk. In Anobee's test, one screenshot was 41 KB as AVIF, 57 KB as WebP and 383 KB as PNG through Cloudinary. Use SVG for logos and icons, and keep a JPEG or PNG fallback when you serve AVIF.
What image size is best for SEO?
There is no single best size. Make the file about twice the width it displays at, so it stays sharp on high-density screens. Anobee's article column is 680px wide, so body images are 1360px wide. For Article structured data, Google recommends high-resolution images of at least 50K pixels, multiplying width by height, in 16x9, 4x3 and 1x1 ratios.
How can I optimize images for long-tail SEO?
Use a specific filename, alt text that describes exactly what the image shows, a caption that adds context, and place the image beside the text about that same topic. Google says it uses captions and page context to understand images. A screenshot of a precise step matches a precise question better than a stock photo, and you do not need to repeat the keyword.
Do image file names affect SEO?
Yes, a little. Google asks for short, descriptive filenames instead of generic names such as image1.jpg. Rename files before uploading, because renaming later changes the URL.
Does compressing images improve rankings?
Not directly. Compression makes pages faster, and speed is one of many signals. If PageSpeed Insights does not flag your images, compressing them further will not help. On Anobee's test page the estimated image saving was 6.4 KiB, so the remaining delay had a different cause.
Sources and References
- Google Search Central: Image SEO best practices ↩
- MDN: Image file type and format guide ↩
- web.dev: Optimize Largest Contentful Paint ↩
- web.dev: The performance effects of too much lazy loading ↩
- web.dev: How the Core Web Vitals metrics thresholds were defined ↩
- Google Search Central: Article structured data ↩
- PageSpeed Insights ↩
Was this guide helpful?
Your answer helps Anobee improve future updates.

Written by
Bibek Thapa
AI-Powered Digital Growth Strategist
Bibek Thapa works across AI workflows, SEO, AI search optimization, content strategy, website growth, and productivity systems at Anobee.
- AI workflows
- Digital growth
- SEO
- GEO
- AEO
- Content strategy
- Website growth